EMG classification (CatBoost)
End-to-end walkthrough of examples/synthetic/emg_classification.py: synthetic 8-channel EMG → RMS+MAV features (from myogestic.recipes.features) → CatBoost binary classifier → smoothed hand pose → VHI.
Code below is included from the example
The Python blocks in this walkthrough are pulled verbatim from the example file via snippet includes, so they can't drift from the runnable script.
End to end, zero classes besides the framework's App and Pipeline.
Run it first
One terminal, then click Launch in the GUI's process_launcher panel to spawn the synthetic EMG generator.
VHI is optional for this demo - the predicted hand pose is pushed over an LSL outlet whether or not VHI is listening. To see the 3D hand, install it once with python -m myogestic.tools.install_vhi (see Install the Virtual Hand) and run it alongside.
What you should see
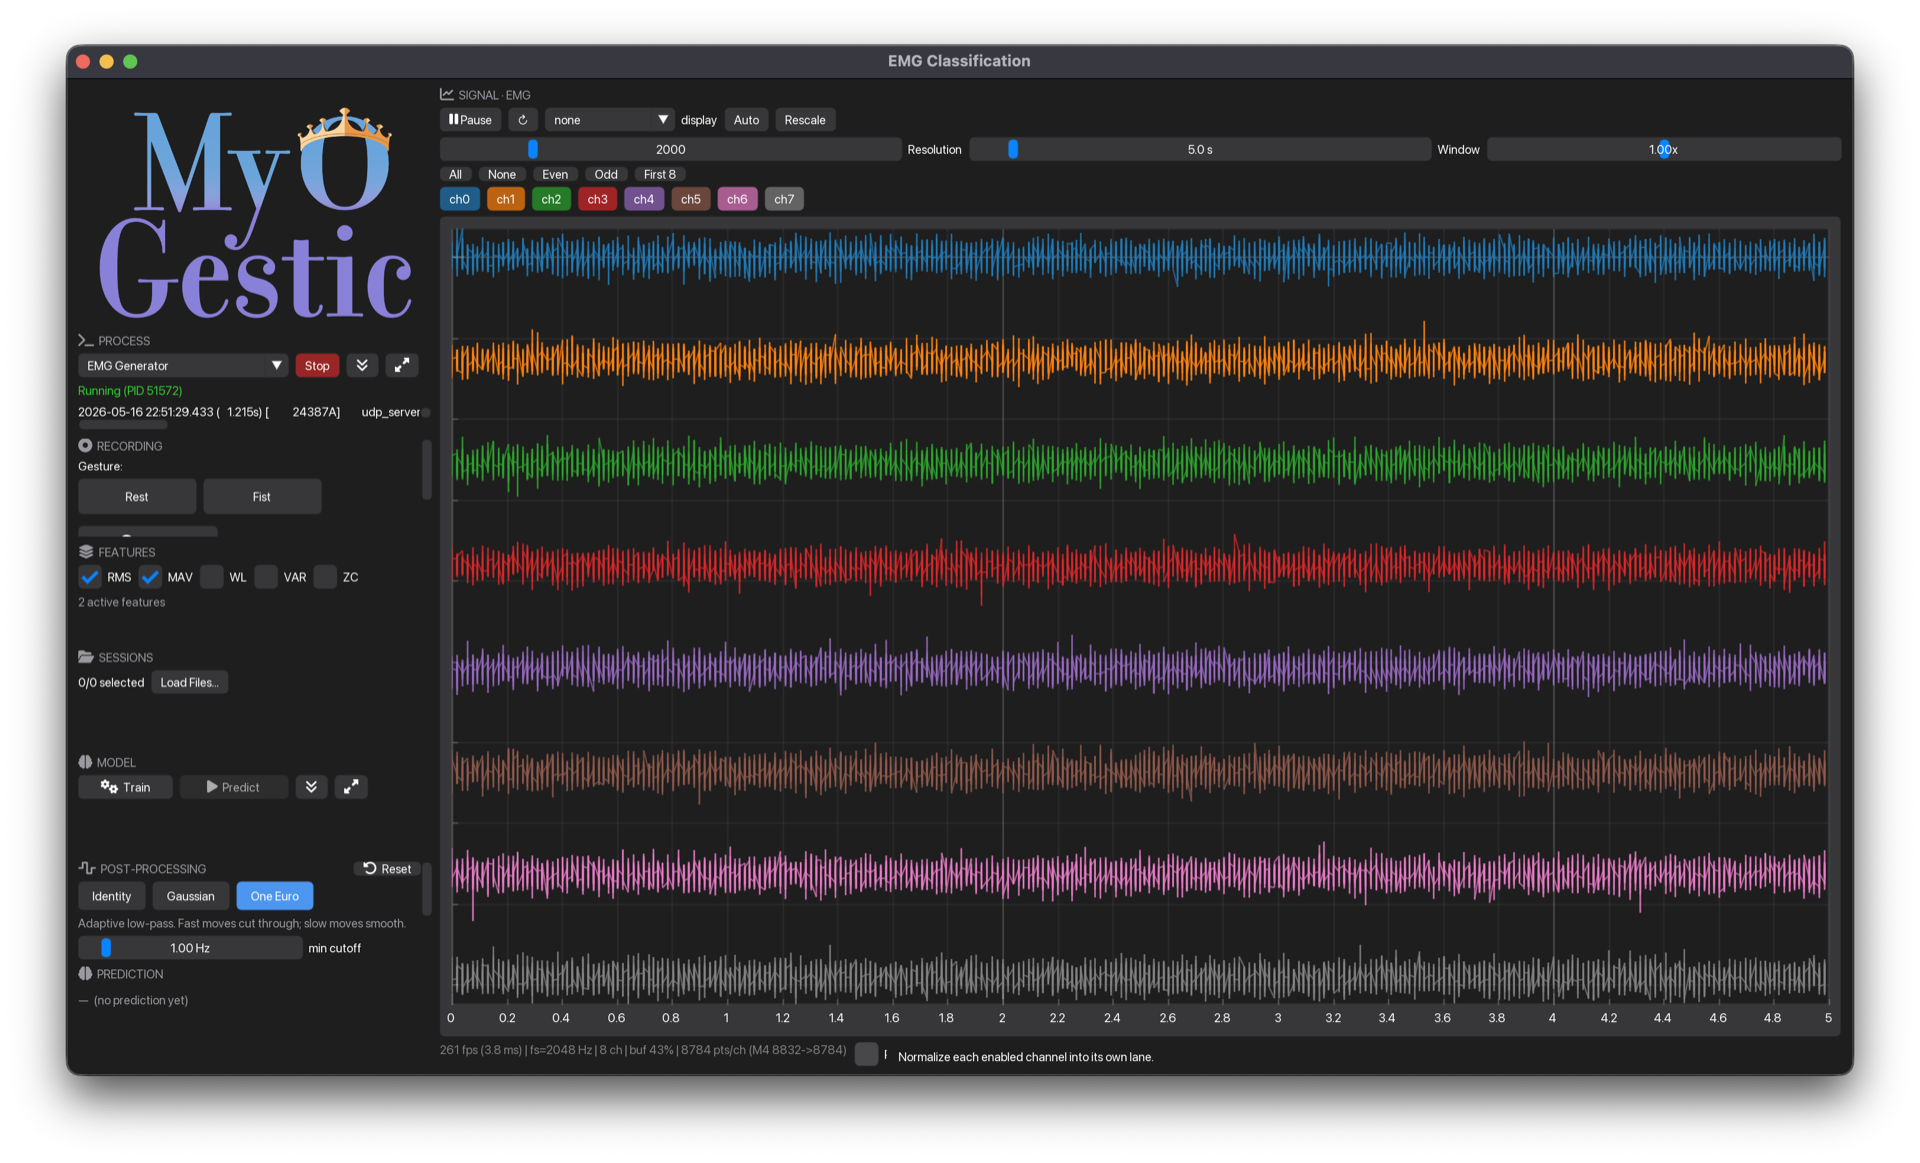
A 3-column window:
- Right two columns: live EMG signal viewer.
- Left column, top to bottom: logo, EMG-generator launcher, recording controls, feature selector, session manager, pipeline panel, output-filter panel, prediction label.
Click Launch on EMG Generator → synthetic 8-channel signal flows. If you started VHI separately, the predicted pose drives its 3D hand.
The walkthrough
The whole script is structured top-to-bottom: imports → outputs → constants → app setup → callbacks → layout → app.run(). Read it in that order.
1. Outputs and side-channels
control_outlet() is the one-liner over the boilerplate StreamOutlet(StreamInfo(name="EMG_Control", stype="Control", n_channels=1, ...)) - see myogestic.tools.emg_generator.control_outlet. The synthetic generator listens on EMG_Control for which class pattern to emit. Click "Fist" in the button strip → ctrl_outlet.push_sample([1.0]) → generator switches to pattern 1.
vhi = virtual_hand()
vhi_outlet = vhi.outlet()
HAND_REST = np.zeros(9, dtype=np.float32)
HAND_FIST = np.array([-1, 0, -1, -1, -1, -1, 0, 0, 0], dtype=np.float32)
VHI consumes a 9-vec pose; we hand-define the two target poses (rest and full fist). The model just chooses between them.
2. The output filter
FilterControl is the post-processing widget - exposes a UI panel and is callable. We'll wire the call inside predict() and the panel inside @app.ui.
See Post-process predictions for tuning.
3. Feature set
features = FeatureSelector(
    {"RMS": rms, "MAV": mav, "WL": wl, "VAR": var, "ZC": zc},
    default=["RMS", "MAV"],
)
FeatureSelector holds a menu of named feature functions - the reference rms/mav/wl/var/zc from myogestic.recipes.features, plus any of your own callables - and renders a panel to toggle them live. Calling it, features(window), runs every active feature over the channels-first window and stacks the results into one flat vector. default=["RMS", "MAV"] ticks two on at startup.
4. App, stream, pipeline
WINDOW_MS = 200
HOP_MS = 100

app = App("EMG Classification", ui_scale=0.85)
app.streams(
    Stream("emg", source=LSLSource("TestEMG1"), window_ms=WINDOW_MS, buffer_ms=60000)
)
pipeline = Pipeline(app)
The stream window is 0.2 s - every extract() call sees the most-recent 0.2 s of EMG, channels-first as (n_channels, n_samples). The buffer is 60 s so signal_viewer shows a longer history than the prediction window.
5. extract - same code for training and live predict
@pipeline.extract
def extract(windows: dict[str, np.ndarray]) -> np.ndarray:
    """Active features stacked along axis 0 → flat feature vector."""
    return features(windows["emg"])
features(windows["emg"]) runs every active feature over the window (channels-first (n_channels, n_samples)) and returns one flat vector. The same function is invoked from inside train() (over recorded windows) and on the predict thread (over live windows), so training and inference always see identical features.
6. train - slice sessions, featurize, fit
@pipeline.train
def train(data: TrainingData):
    """Train CatBoost classifier on numpy features from selected sessions.

    Each labeled trial is chopped into fixed-size windows (0.2s) so the
    feature vectors all share a shape - all features here reduce a
    window to one scalar per channel, so total feature dim is
    ``n_active_features * n_channels``.
    """
    if data.is_empty:
        raise ValueError("No sessions selected. Load some and tick the checkboxes.")
    if len(data.classes) < 2:
        active = sorted(data.classes)
        names = [CLASSES[i] if 0 <= i < len(CLASSES) else f"c{i}" for i in active]
        raise ValueError(
            f"Classification needs ≥2 active classes — got {len(active)} ({names}). "
            f"Toggle more class chips on."
        )
    if features.n_active == 0:
        raise ValueError(
            "No features ticked in the FEATURES panel. Tick at least one "
            "(RMS+MAV is the default combo)."
        )
    print(f"[train] features: {features.active_names}")

    all_X: list[np.ndarray] = []
    all_y: list[int] = []

    for window, _ts, class_idx in iter_labeled_windows(
        data.paths, "emg", WINDOW_MS, HOP_MS, classes=data.classes
    ):
        all_X.append(extract({"emg": window}))
        all_y.append(class_idx)

    print(
        f"[train] {len(all_X)} windows from {len(data.paths)} sessions, "
        f"classes={sorted(data.classes)}"
    )
    if len(all_X) < 2:
        raise ValueError(f"Need at least 2 windows, got {len(all_X)}")

    X = np.stack(all_X)
    y = np.array(all_y)

    if len(np.unique(y)) < 2:
        raise ValueError(f"Need at least 2 classes, got {len(np.unique(y))}")

    clf = catboost_classifier(iterations=100)
    clf.fit(X, y)
    print(f"[train] done — accuracy on train: {clf.score(X, y):.2%}")
    return clf
iter_labeled_windows does all the session-loading, label-track walking, and overlapping-window slicing - see Record and replay. We just call extract() on each window.
The validation up front (is_empty, len(data.classes) < 2) gives the user actionable error messages - the framework's design principle "errors tell you what to write." If you forget to tick a session in session_manager, you'll see "No sessions selected. Load some and tick the checkboxes." in the status panel.
7. predict - classify, look up pose, smooth, push
@pipeline.predict
def predict(model, features):
    """Classify → map to hand pose → smooth → push to VHI.

    Filter applies only to the physical-control vector; class probabilities
    flow through unchanged for the UI / debug overlay.
    """
    proba = model.predict_proba(features.reshape(1, -1))[0]
    class_idx = int(np.argmax(proba))
    hand = HAND_FIST.copy() if class_idx == 1 else HAND_REST.copy()
    hand = output_filter(hand).astype(np.float32)
    vhi_outlet.push(hand)
    return {"class": class_idx, "proba": proba, "hand": hand}
The pose lookup is a hardcoded if/else - small enough not to need a class table. Smoothing happens after pose lookup so the user sees smooth blends between rest and fist as the classifier flips. The dict return goes to pipeline.predictions for any widgets that want to display class probabilities.
Why filter the pose, not the class index?
OneEuro expects a continuous vector. Class indices are integers, smoothing them is meaningless. Smoothing the pose vector lets the hand fade between HAND_REST and HAND_FIST cleanly even if the classifier flips on the boundary.
8. Layout
LOGO_CELL_W = 300
WORDMARK_ASPECT = 800 / 540
grid = Grid(
    8,
    3,
    row_height=[Px(LOGO_CELL_W / WORDMARK_ASPECT), *[Fr(1)] * 7],
    col_width=[Px(LOGO_CELL_W), Fr(1), Fr(1)],
)


def _on_gesture(i: int) -> None:
    ctrl_outlet.push_sample(np.array([CTRL_VALUES[i]], dtype=np.float32))  # type: ignore


@app.ui
def demo_ui(ctx):
    with grid[0:8, 1:3]:
        signal_viewer(ctx, "emg")

    with grid[0, 0]:
        # No size cap — let the wordmark grow to the cell. The widget
        # fits-in-rect (preserving aspect), so the image always renders
        # at the largest aspect-preserving box that fits the current
        # cell dimensions and centres itself.
        app_logo()

    with grid[1, 0]:
        process_launcher(PROCESSES)

    with grid[2, 0]:
        recording_controls(
            ctx,
            CLASSES,
            on_record=app.start_recording,
            on_stop=app.stop_recording,
            on_gesture=_on_gesture,
        )

    with grid[3, 0]:
        features.ui()

    with grid[4, 0]:
        pipeline.training_data = session_manager("sessions", class_names=CLASSES)

    with grid[5, 0]:
        pipeline_panel(pipeline)

    with grid[6, 0]:
        output_filter.ui()

    with grid[7, 0]:
        prediction_label(pipeline, CLASSES)
An 8×3 grid: the signal viewer fills the right two columns, and the left column stacks eight widget calls top-to-bottom - logo, EMG-generator launcher, recording controls, feature selector, session manager, pipeline panel, output-filter panel, prediction label. Every panel is a plain function call. session_manager returns a TrainingData instance - assigning it to pipeline.training_data is the only line that connects "what's ticked in the UI" to "what train() will see."
9. The actual experiment loop
In the GUI:
- Click
Launchon EMG Generator → live signal appears. - (Optional) start VHI separately → its 3D hand mirrors the predicted pose.
- Click the Rest button → generator emits the rest pattern.
- Click Record → start saving to
sessions/<timestamp>/. - Hold rest for ~3 s, click Fist, hold fist ~3 s, click Rest, hold rest ~3 s, click Fist… (cycle-style - see Record and replay).
- Click Stop.
- Repeat for a few cycles.
- Tick all sessions in session_manager.
- Click Train → console prints
[train] N windows from M sessions ... done - accuracy on train: ~99%. - Click Predict → VHI hand follows your button clicks live.
Tune the One Euro sliders in the filter panel while predicting to feel the lag/responsiveness trade-off in real time.
Variations
- More classes: bump
CLASSES,CTRL_VALUES,--classes, and add newHAND_*poses. Thepredictif/elsebecomes a dict lookup. - Different feature set: swap RMS/MAV for whatever your domain needs. Keep
extract()'s return shape consistent across training and live. - Different model: replace
catboost_classifierwith sklearn / XGBoost / PyTorch. See Add a custom model for the patterns. - Real hardware: replace
LSLSource("TestEMG1")with a real source - see Add a custom source.