Getting started
Install
MyoGestic uses uv for environment management. From a fresh clone:
The base install gives you the framework - sources, widgets, the ML pipeline, the recording layer, and the synthetic EMG generator - without forcing scientific Python heavyweights on you.
Optional extras (pick what you need):
| Extra | What it adds |
|---|---|
examples |
catboost, myoverse, torch, scikit-learn (so the demos run) |
dev |
the above plus pytest and ruff |
serial |
pyserial (serial sources/outputs) |
grpc |
grpcio (gRPC control plane to the Virtual Hand Interface) |
bdi |
OT Bioelettronica devices |
brainflow |
BrainFlow device support |
zarrs |
Rust-accelerated Zarr codec |
docs |
properdocs + mkdocs-material + mkdocstrings (this site) |
Run the synthetic-EMG demo
The repository ships a synthetic LSL stream so the demos run without any hardware. One terminal, then click two buttons in the GUI - the demo's ProcessLauncher panel spawns the generator (and the Virtual Hand) for you.
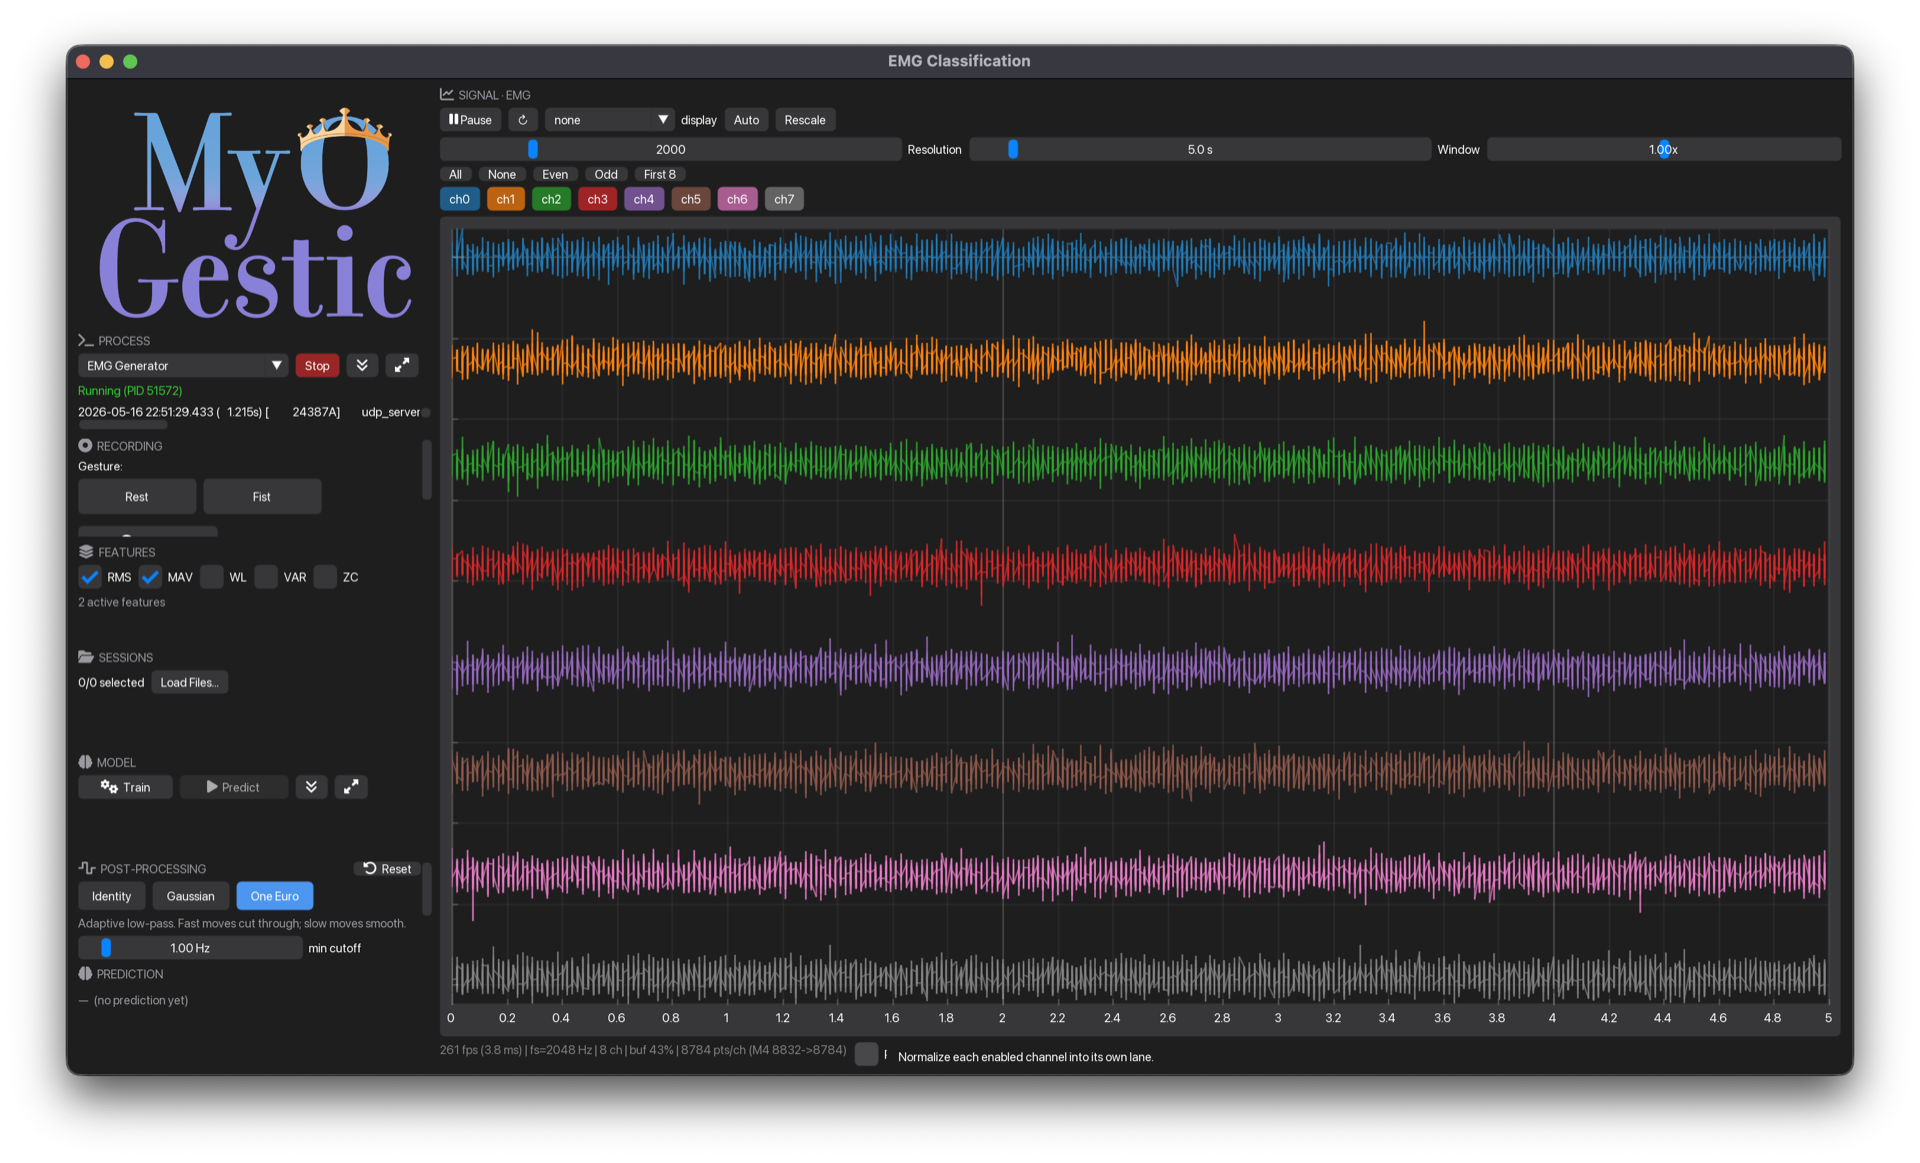
In the window:
- Click Launch on EMG Generator (top-left) - the synthetic 8-channel signal appears in the viewer on the right.
- (Optional) Click Launch on VHI Hand if
VHI_PATHandGODOT_BINare set; otherwise the button shows a click-time error and you can ignore it.
The rest of the layout:
- An 8-channel signal viewer filling the right two columns.
- A
Rest/Fistbutton strip on the left. - Recording controls, the pipeline panel, the output filter panel, and the session manager - top to bottom on the left.
Running the generator standalone
If you'd rather drive the generator from a separate terminal (handy when you want to share one generator across multiple demos), the in-GUI launcher just runs:
The demo's signal viewer will pick up whichever stream is publishing on the matching name.What you just ran
Each thing visible in the window maps directly to one MyoGestic primitive. Once you can map the GUI to the framework, the rest of the docs make a lot more sense.
- Signal viewer (right two columns) - a
SignalViewerwidget reading from aStream. The stream owns the ring buffer; the widget just renders a decimated min/max envelope. - Process launchers (top-left) - the
ProcessLauncherwidget. Each entry is a subprocess command - here, the synthetic EMG generator and the Virtual Hand. - Recording controls with
Rest/Fistbuttons and a Record button - theRecordingControlswidget. Clicking a button writes a label event; clicking Record togglesapp.start_recording()/app.stop_recording(). - Train / Predict / Save / Load buttons -
PipelinePanelplusSaveModelButton/LoadModelButton. They drive thePipelinestate machine. - Post-processing filter panel - a
PostProcessorwidget. The script also calls it from insidepredict()to smooth the output vector before pushing. - Sessions - the
SessionManagerwidget. It returns aTrainingDataobject the script assigns topipeline.training_data, which is what@pipeline.trainreceives when you click Train.
Want the code-side view of the same thing? Read Anatomy of a MyoGestic app - it walks through a complete 35-line script in the order you write it.
A first experiment
The minimum closed-loop experiment is ~40 lines. Open examples/synthetic/emg_classification.py for a walkthrough - see the EMG classification tutorial for a line-by-line read.
Next steps
- Browse the guides - end-to-end walkthroughs first, then task recipes by job.
- Read Concepts to understand streams, the pipeline, and the threading model.
- Skim the API cheatsheet when you need a quick lookup.